CI/CD With Github and DBT Cloud
Data Engineering
Purpose
You’ve seen it before; Some developer gets up on a soap box to teach their amazingly clean and efficient ci/cd deployment pipeline that will solve all your software and data engineering problems. However, this is not the case. I don’t have all the answers to your CI/CD problems—quite the opposite. What I am proposing here will make your job difficult by introducing so many checkpoints in place that it is a burden to update your DDL rapidly. I will slow you down and force you to think about the changes you make to your model, macro, and property files. Why would I do this? Because building the gold standard of data warehouses is difficult. Keeping data from becoming a spaghetti monster is nearly impossible. Therefore, the less cognitive load on data engineers the better. So I will share some tools I use and how I implement them to take that burden off your shoulders.
These days there is a wide selection of tools and frameworks that can practically write code for you. Therefore, let’s leverage some of those tools to speed up development by slowing down. Let the bots share the burden of pull request validation and review. Require humans to have a light touch on the review process. Allow the engineers to solve complex problems rather than worry about the formatting of their SQL. So let’s dig in and make engineer’s lives better, or worse depending on how you look at it.
Background
Historically, the data lake, data lakehouse, and data warehouse have not benefited from CI/CD concepts. In today’s data engineering, ensuring high-quality DDL changes through Continuous Integration (CI) and Continuous Delivery (CD) is crucial. Tools like dbt, GitHub Actions, and Snowflake, along with pre-commit hooks and SlimCI, offer a robust way to automate and safeguard code changes. Therefore it is best if we start with the basics – definitions:
Continuous Integration
Continuous Integration (CI) in this context describes the process of introducing iterative changes to your DDL and therefore iterative changes to your data warehouse.
Continuous Delivery
Continuous Delivery (CD) describes the process of deploying those changes through an automated workflow to eliminate the need for manual intervention.
Code Standards
Code Standards are the bare minimum standards for what is considered safe, sane, and production-ready code. Code in this context will largely be our DDL written in SQL using the dbt framework but might also include YAML, Python, and other files.
The Sofware Delivery Life Cycle (SDLC)
Those of you who come from software development should be familiar with this concept but for many in the data engineering space, this is new territory. However, when dealing with CI/CD automation we must understand the life cycle of our code because our data is only as good as the code we write. Developing a scalable automated data platform doesn’t happen on a whim and a prayer. Well, at the very least a whim and a prayer will only get you so far.
The typical SLDC of DDL code looks something like this:

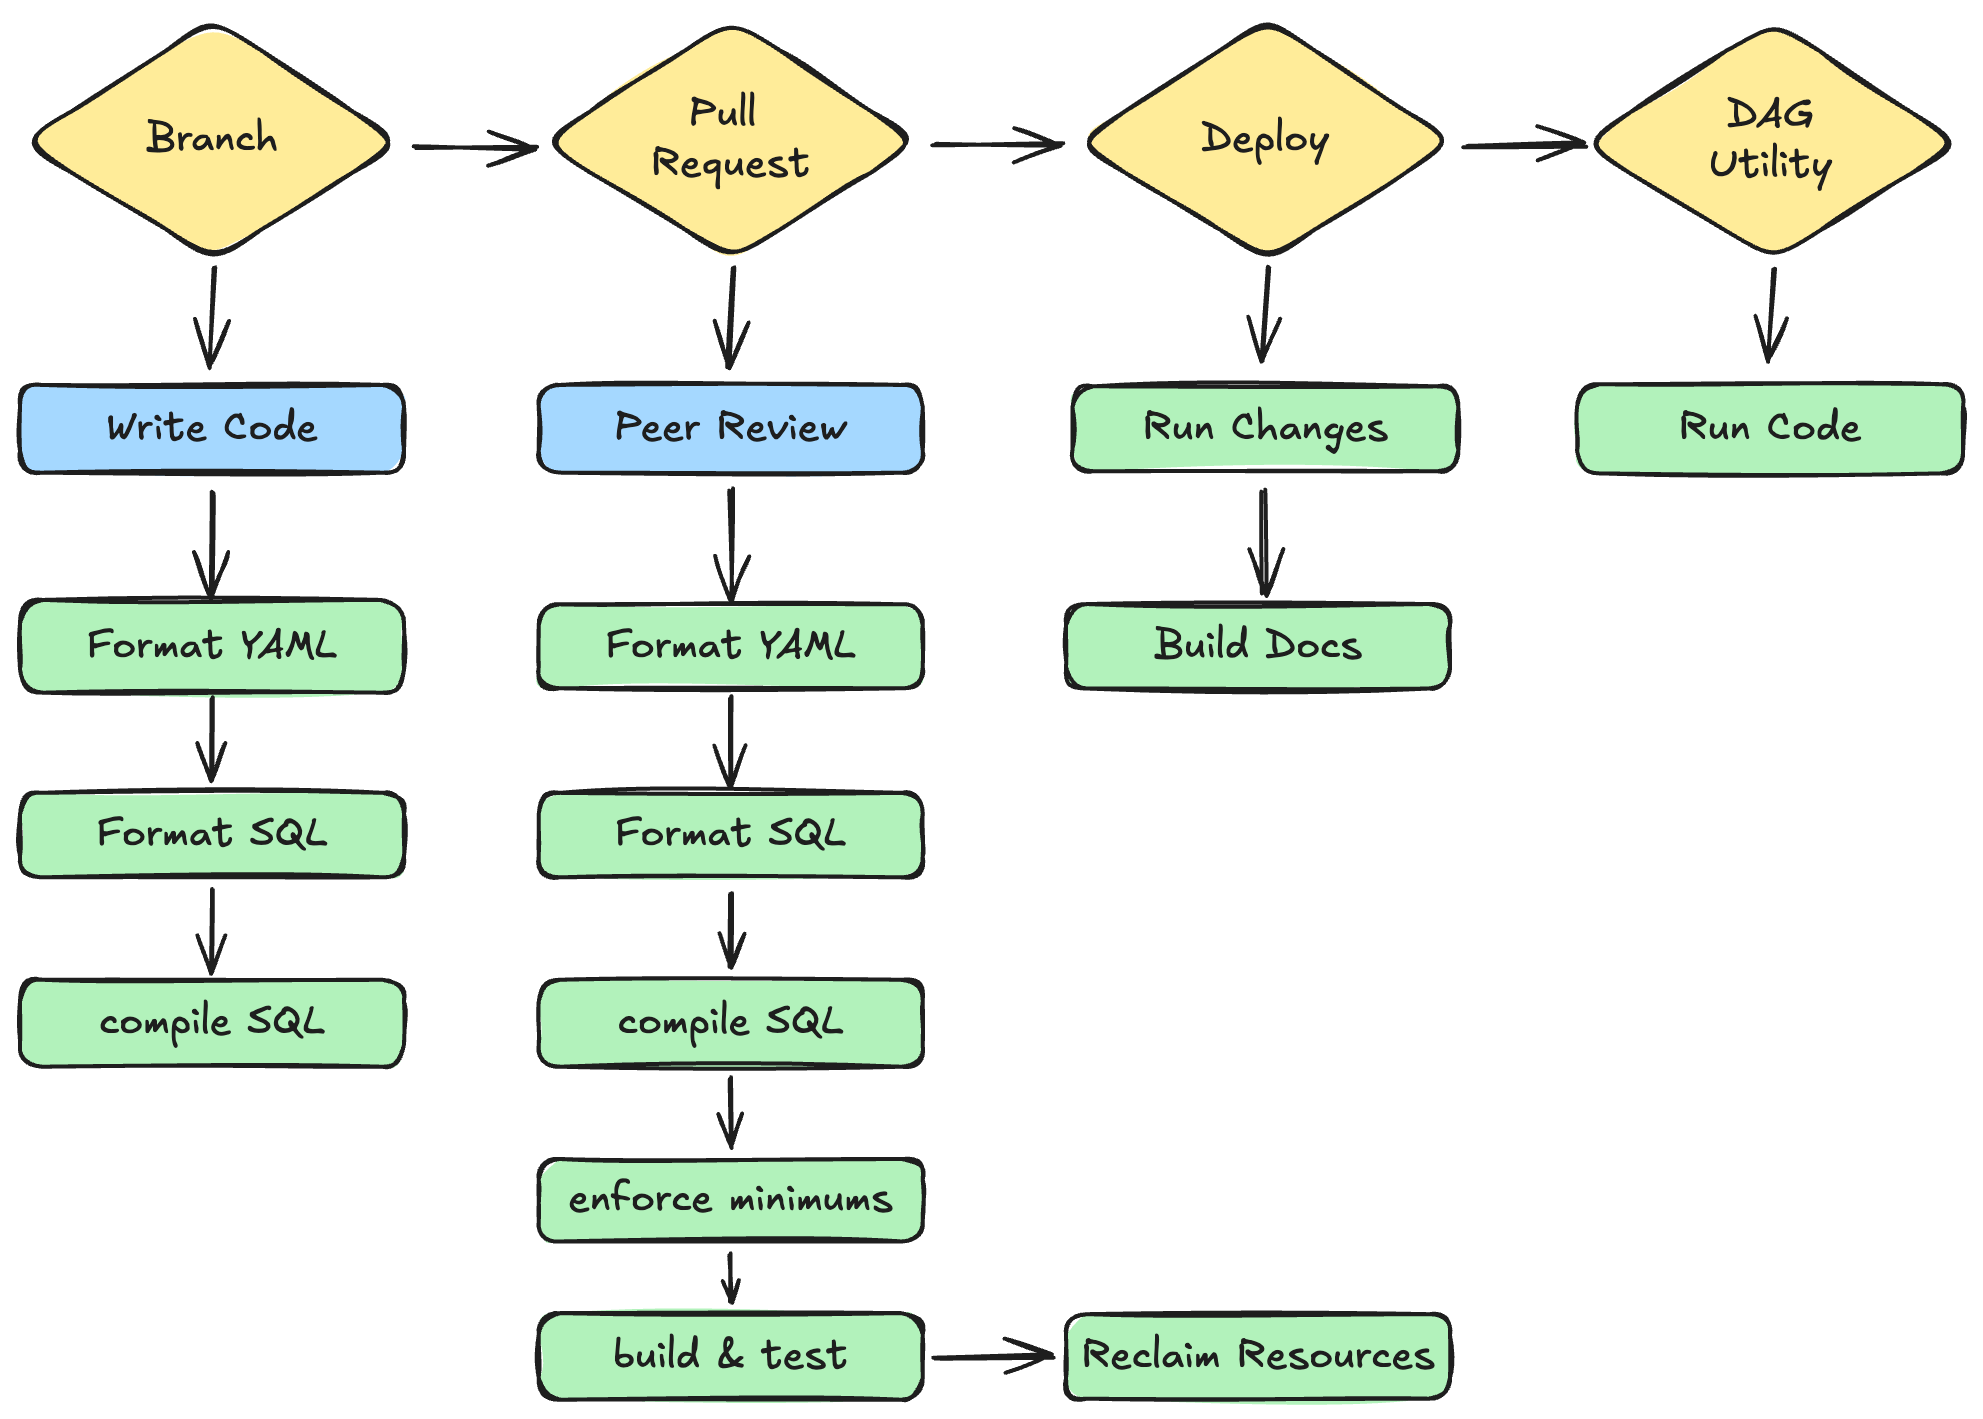
A data engineer creates builds or updates a model (dbt framework), and then makes sure it runs (dbt-snowflake). If all looks good, they proceed to create a pull request in version control (Github) and if lucky receive a peer review. Once approved the code is merged into the main branch where the DAG utility (dbt cloud) runs the models to load the data into the data warehouse. Easy peasy, lemon squeezy, right? Wrong!
This workflow is riddled with manual steps and relies on humans to validate DDL changes which is only 30% of the effective change. The other 70% of a typical update is the manipulated data which has cascading impacts on any downstream transformations. If you are lucky enough to include tests in your change, when are those tests run? More importantly what data are those tests running against? Mock data will only get you so far before pushing code to production. So let’s identify the the problems we want to solve today.
The Problem
As a staff data engineer, I want to have a deployment pipeline that instills trust in my team’s changes. I want to ensure all members regardless of seniority or experience are meeting simple code standards, adding minimal testing, and limiting impacts for downstream consumers. Most of all I don’t want to manage this manually! Let’s face it, we all have better ways to spend our very costly time. The key challenges we aim to solve are:
- Lack of consistent code standards across teams.
- Manual DDL validation leads to slow releases and errors.
- Downstream impact from untested changes.
The Proposal
Install automated validations at every step of the SDLC such that they become ever increasingly difficult to break thereby the time the code reaches production it is as hardened as possible with minimal cost and impact on developer happiness. In other words something like this:
Let’s Dig In
We are going to work our way from left to right through the above diagram and address each stage individually. However, at a high level, we are introducing automation at every stage in increasing complexity to remove the need for deep domain knowledge and reduce manual intervention while simultaneously increasing the value and resilience of our code. So let’s begin!
Step 1: Branch
At this stage, we are focusing on minimal interference to increase developer happiness without losing stability in changes or requiring a complete overhaul of those changes later in the life cycle.
Code
This is the human element and there is little to be done. This is where the engineer get’s creative, provides value, and gets a little endorphin rush when everything finally compiles and runs. This is also where all the problems are introduced which is why the following steps are so important
Formatting
Luck for us we live in a world of open-source tools that handle the vast majority of this first automation. Most developers are familiar with code linting and SQL is no exception. However, a modern dbt project also includes properties files (YAML), macros (Jinja), and dependency software (Python). This is where pre-commit comes into play.
TL;DR pre-commit is a framework to install, run, and manage git hooks. Git hooks are workflows that run at various pre-defined steps of the git flow. Namely, we are going to leverage the following two hook stages:
- Pre-commit: Not to be confused with the tool of the same name, this is triggered when committing code (ie
git commit -m “my awesome code”) - Pre-push: This hook is triggered when a developer pushes code to the cloud (Github) (ie.
git push)
First we need to add the dependency to our project. In the root of our project open the requirements.txt and add the following software:
# requirements.txt

pre-commit==3.8.0
sqlfluff==3.0.7
sqlfluff-templater-dbt==3.0.7
Save the file and install using the following command
pip install -r requirements.txt
With the software installed we need to install and configure pre-commit validations for our project. Let’s start small and build up as we go. Pre-commit kindly comes with a built-in template that we can use to get us started. Simply run:
pre-commit sample-config >> .pre-commit-config.yaml
Then open the resulting file, you should see something like this:
# See https://pre-commit.com for more information
# See https://pre-commit.com/hooks.html for more hooks
repos:
-   repo: https://github.com/pre-commit/pre-commit-hooks
    rev: v3.2.0
    hooks:
    -   id: trailing-whitespace
    -   id: end-of-file-fixer
    -   id: check-yaml
    -   id: check-added-large-files
We are going to modify this file with a few extra items. We are going to ensure that we install both the pre-commit and pre-push hook stages, and also add sqlfluff to the validations. To do this update your config with to look like this:
# See https://pre-commit.com for more information
# See https://pre-commit.com/hooks.html for more hooks
variables:
  - &sqlfluff '3.0.7'
  - &dbt_snowflake 'dbt-snowflake==1.7.0'
  - &sqlfluff_templater_dbt 'sqlfluff-templater-dbt==3.0.7'

default_install_hook_types:
  - pre-commit
  - pre-push

repos:
  - repo: https://github.com/pre-commit/pre-commit-hooks
    rev: v2.3.0
    hooks:
      - id: requirements-txt-fixer
      - id: check-yaml
      - id: end-of-file-fixer
        stages: [pre-commit, pre-push]
      - id: trailing-whitespace
        stages: [pre-commit, pre-push]

  - repo: https://github.com/sqlfluff/sqlfluff
    rev: *sqlfluff
    hooks:
      - id: sqlfluff-fix
        stages: [pre-commit, pre-push]
        additional_dependencies: [*dbt_snowflake, *sqlfluff_templater_dbt]

      - id: sqlfluff-lint
        stages: [pre-push]
        additional_dependencies: [*dbt_snowflake, *sqlfluff_templater_dbt]
In addition to setting the default hook stages, we have installed the SQLFluff fix and SQLFluff lint validations. These will now run automatically before committing or pushing code. To make life easier we are using yaml variables to manage the versioning of dependencies for sqfluff.
Save and close the config file and then run pre-commit install
Now whenever you commit code or push code you should get something like this
[WARNING] Unexpected key(s) present at root: variables
Fix requirements.txt..................(no files to check)Skipped
Check Yaml................................................Passed
Fix End of Files..........................................Passed
Trim Trailing Whitespace..................................Passed
sqlfluff-fix..............................................Passed
Note: Never mind the warning. That is there because variables are not part of the default pre-commit yaml syntax, but they are parsed nonetheless. If you prefer not to see this warning, you can configure the pre-commit template without variables.
Step 2: Pull Request
Before we publish this code to a pull request we want to ensure we have a few extra validations in place. To accomplish this we are going to once again use the pre-commit framework by adding a pre-push hook stage.
Pre-Push
Specifically, before we push our code up to Github and open a pull request we should ensure that the SQL we’ve written compiles. In addition, it would be great if everyone on the team added one unique and not_null data test to the primary keys on all models as a minimum. Lastly, we want to ensure that our changes do not negatively impact any downstream dependencies. To do this we will run the changed models plus one child dependency.
To do this update the .pre-commit-config.yml with the following additions:
# See https://pre-commit.com for more information
# See https://pre-commit.com/hooks.html for more hooks
variables:
  - &sqlfluff '3.0.7'
  - &dbt_snowflake 'dbt-snowflake==1.7.0'
  - &sqlfluff_templater_dbt 'sqlfluff-templater-dbt==3.0.7'

default_install_hook_types:
  - pre-commit
  - pre-push

repos:
  - repo: https://github.com/pre-commit/pre-commit-hooks
    rev: v2.3.0
    hooks:
      - id: requirements-txt-fixer
      - id: check-yaml
      - id: end-of-file-fixer
        stages: [pre-commit, pre-push]
      - id: trailing-whitespace
        stages: [pre-commit, pre-push]

  - repo: https://github.com/sqlfluff/sqlfluff
    rev: *sqlfluff
    hooks:
      - id: sqlfluff-fix
        stages: [pre-commit, pre-push]
        additional_dependencies: [*dbt_snowflake, *sqlfluff_templater_dbt]

      - id: sqlfluff-lint
        stages: [pre-push]
        additional_dependencies: [*dbt_snowflake, *sqlfluff_templater_dbt]

   - id: sqlfluff-lint
        stages: [manual] # ci
        additional_dependencies: [*dbt_snowflake, *sqlfluff_templater_dbt]
        args: ["--format", "github-annotation", "--write-output", "./sqlfluff_annotations.json"]

  - repo: https://github.com/dbt-checkpoint/dbt-checkpoint
    rev: v2.0.3
    hooks:
      - id: dbt-compile
        stages: [pre-push, manual]

      - id: dbt-parse
        stages: [pre-push, manual]

      - id: check-model-has-tests-by-name
        stages: [pre-push]
        args: ["--tests", "unique=1", "not_null=1", "--"]

      - id: dbt-run
        stages: [pre-push]
        args: ["--model-postfix", "+1", "--"]
No, you are not seeing a duplicate SQLFluff step, we will get to that in a moment. In the meantime, this new addition will compile the SQL, ensure all properties files have tests, and run the changed models +1 dependency before pushing the branch to Github.
An additional sqlfluff-lint step has been provided with alternate arguments than our first linting step. Note that this validation along with a few others have been tagged with the manual hook stage. We are going to leverage this validation grouping in the CI builds. For the next step, we are going to move to GitHub.
GitHub Actions
GitHub actions are a powerful automation tool that is worthy of a discussion all its own. However, for the sake of brevity, we will save that for another article. Implementing these validations may seem redundant at this stage, but perhaps you have some folks using the DBT cloud IDE. In that case, they are limited in the software they can use. Overlapping validations at this and the previous step ensures that all team efforts are observed equally.
To get started we need to create the following two configuration files required to leverage our pre-commit validations in Github:
- Profiles.yml - provides the account logging information for the action
- Workflow - provides the recipe for running the action
Profile
To run dbt-checkpoint and SQLFLuff in the cloud we will need a profile for GitHub to use. Open a file .github/ci_profiles/profiles.yml and add the following:
dbt_project_name:
  target: dev
  outputs:
    dev:
      type: snowflake
      threads: 8
      client_session_keep_alive: true
      account: "{{ env_var('SNOWFLAKE_ACCOUNT') }}"
      database: "{{ env_var('DATABASE') }}"
      schema: "{{ env_var('SCHEMA') }}"
      user: "{{ env_var('USER') }}"
      password: "{{ env_var('PASSWORD') }}"
      role: "{{ env_var('ROLE') }}"
      warehouse: "{{ env_var('WAREHOUSE') }}"
Note that this profile uses environment variables for the values of each parameter in the profile. This will be supplied by our GitHub action.
Workflow
Next open .github/workflows/code-compliance.yml and add the following:
name: Code Compliance

on:
  pull_request:
  push:
    branches: [main]

jobs:
  validate:
    runs-on: ubuntu-latest
    environment: ci_environment
    env:
      DBT_PROFILE_DIR: ./.github/ci_profiles
      SNOWFLAKE_ACCOUNT: ${{ vars.SNOWFLAKE_ACCOUNT }}
      DATABASE: ${{ vars.CI_DATABASE }}
      SCHEMA: ${{ vars.CI_SCHEMA }}
      USER: ${{ vars.CI_USER }}
      PASSWORD: ${{ secrets.CI_PASSWORD }}
      ROLE: ${{ vars.CI_ROLE }}
      WAREHOUSE: ${{ vars.CI_WAREHOUSE }}
    steps:
    - uses: actions/checkout@v4

    - name: Install Python
      uses: actions/setup-python@v5
      with:
        python-version: '3.11'
        cache: pip

    - name: Install Python dependencies
      run: pip install -r requirements.txt

    - name: Cache DBT packages
      uses: actions/cache@v4
      with:
        path: dbt_packages
        key: ${{ runner.os }}-dbt-packages-${{ hashFiles('**/packages.yml') }}
        restore-keys: ${{ runner.os }}-dbt-packages-

    - name: Install DBT Packages
      run: dbt deps

      - name: get changed files
        id: get_file_changes
        uses: trilom/file-changes-action@v1.2.4
        with:
          output: ' '

      - name: pre-commit
        uses: pre-commit/action@v3.0.1
        with:
          extra_args: --hook-stage manual --files ${{ steps.get_file_changes.outputs.files }}
Note: This requires that the
DBT_PROFILES_DIRwhich points to the profile we just created.
This workflow will build an image install the software dependencies and run the pre-commit validations we set up for the manual hook stage. Once updated save and close the file and push everything up to Git Hub.
SlimCi
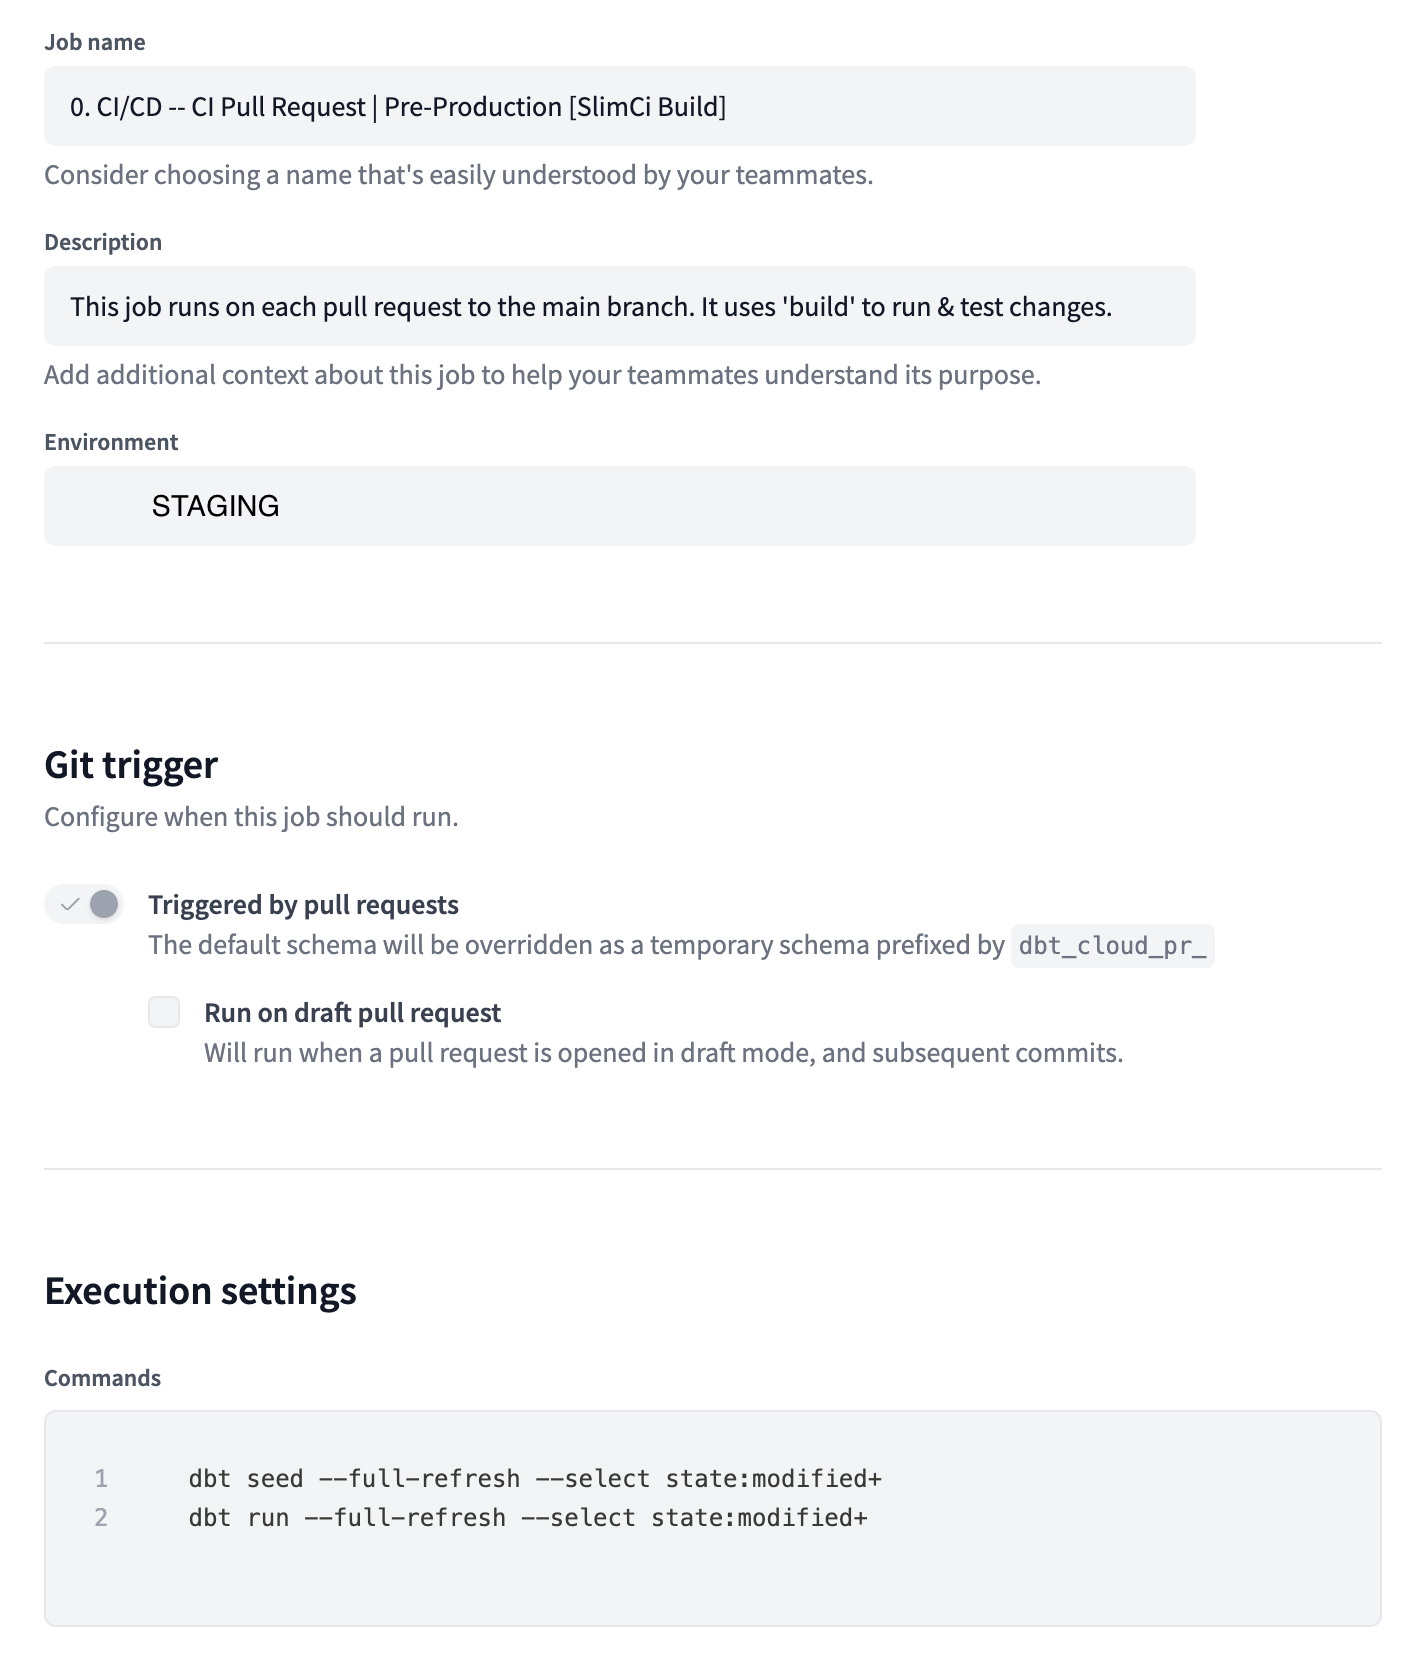
There are many ways to manage a CI build pipeline. Fortunately dbt cloud offers a plug and play integration with Github to mange and perform this task for us. No coding necessary. To learn more on how to set that up it is best to follow dbt labs guide found here:
https://docs.getdbt.com/docs/deploy/continuous-integration
This is what my SlimCI job configuration looks like:
Step 3: Deploying Code
DBT Cloud operates on a schedule. When the code is changed, you could easily allow the scheduled jobs to pick up your new DDL and run it just as it would any other time. However, the trade-off is that lots of changes can be introduced before the next scheduled run, or worse, the next scheduled run is on a weekend – ick! A better solution would be to incorporate all DDL changes automatically and update any impacted data as they are merged. In addition, we want to alert our engineers if this process fails ASAP.
GitHub Actions
The goal is to trigger a job that runs whenever we merge a pull request. To accomplish this, we are going to leverage our good ol’ friend GitHub Actions again! Open a file .github/workflows/cd-job.yml and add the following:
name: cd-job

on:
  push:
    branches: [ master ]

jobs:
  deploy:
    runs-on: ubuntu-latest
    environment: cd_environment
    steps:

    - name: Run dbt cloud job
      env:
        API_TOKEN: ${{ secrets.DBT_ANALYTICS_API_TOKEN }}
        ACCOUNT_ID: ${{ vars.DBT_ACCOUNT_ID }}
        JOB_ID: ${{ vars.DBT_CI_JOB_ID }}
      run: |
        RESPONSE=$(curl -v -H "Authorization:Token $API_TOKEN" -H "Content-Type:application/json" \
          -d '{"cause":"Triggered by github-actions.cd-job","git_branch":"master"}' \
          https://cloud.getdbt.com/api/v2/accounts/$ACCOUNT_ID/jobs/$JOB_ID/run/)
        STATUSCODE=$(echo "$RESPONSE" | jq '.status.code')
        echo "$RESPONSE" | jq '.status.user_message'
        if [[ $STATUSCODE != 200 ]]; then echo "$RESPONSE" && bash -c "exit 1"; fi
Note that we are again leveraging variables and secrets from the GitHub Environment Settings in the previous step.
DBT Cloud
For the above workflow to work, we will also need to set up a CD job that will handle the heavy lifting for us. This will be the $JOB_ID that is provided as part of the cd-job workflow. This assumes you already have a Data Warehouse configured for your DBT Cloud account and have some experience with setting up and configuring jobs:
Visit the Deploy section of the dbt cloud interface and create a new job. Configure the credentials and environment settings. We want this job to run in our production environment and read/write production data. Otherwise, it is up to you to decide.
We will need two commands for this job. Both will need to use the --full-refresh argument to react to schema changes. If this is not used
then it will break the first time an incremental table is materialized and changed.
- Command #1: dbt seed –full-refresh –select state:modified+
- Command #2: dbt run –full-refresh –select state:modified+
- Additional Settings:
- Enable create docs
- Enable source freshness
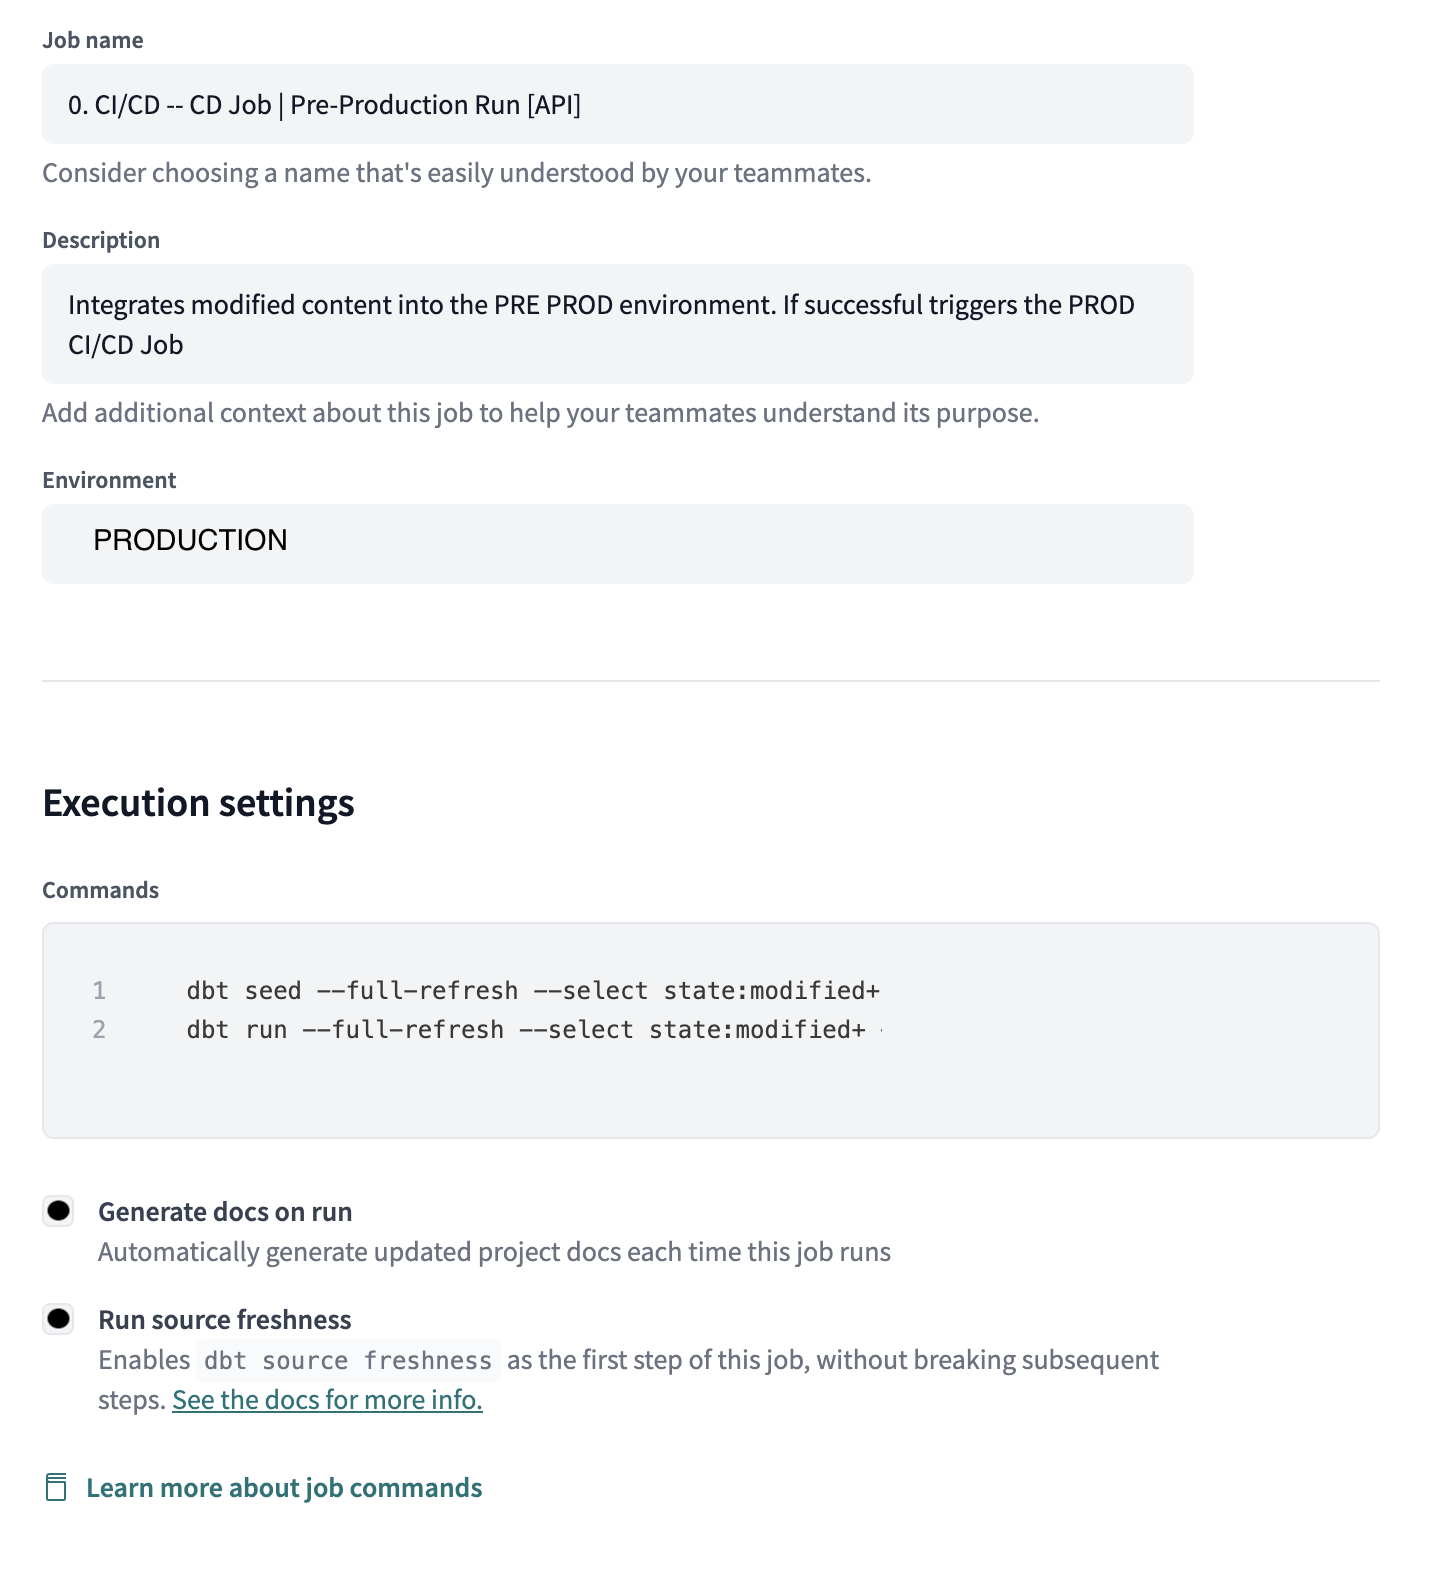
This should look very familiar to the settings used for the SlimCi job. The only difference is the environment the job is run in and also the environment it defers to. Now every time code is merged to the main branch our cd-job action will trigger an API call to run this job ID.
As a final step ensure that job failures send an alert to your channel of choice.
Conclusion
We covered a lot of ground here and I don’t expect this solution to work for everyone. However, removing as much of the cognitive load on your team as possible to free them up to get creative with solving hard problems for stakeholders is worth the extra upfront effort. As my team grows from 3 to 6, to 12 engineers and contributors across multiple teams, I can ensure they are on a path to success from the moment they clone the repository.
Additional Resources
- https://discourse.getdbt.com/t/how-we-sped-up-our-ci-runs-by-10x-using-slim-ci/2603
- https://docs.getdbt.com/docs/deploy/continuous-integration